Showing posts with label DIY. Show all posts

Thursday, January 2, 2014

The kid's Christmas gift

The year, Nate and I decided to make the kids a kitchen for Christmas.  We found an old entertainment center for really cheap on craigslist in October, and began working.  The painting happened pretty quickly, so that we could get it done before it got cold, but we were finishing the details the night before Christmas eve - why does it always work like that... you have tons of time, and you wait until the last minute?  

After the kids when to bed on Christmas eve, Nate and I hauled the kitchen downstairs.  There may have been some injuries and some swearing involved... this thing is solid! And heavy!  Below is the final master piece  (Sorry for the yellow lighting... it was dark out, so the neon sign in the playroom was lighting the room).


Of course their kitchen has a subway tile backsplash :)


All the food is Melissa and Doug, off of Zulilly, but I have some goals of making some more out of felt this year. 


The pots, pans, utensils, and hanging bar all came from Ikea. 

 Cookies baking in the over.  Which happens to be Zoey's favorite part of the kitchen... she takes pretend bites and says 'ummm'
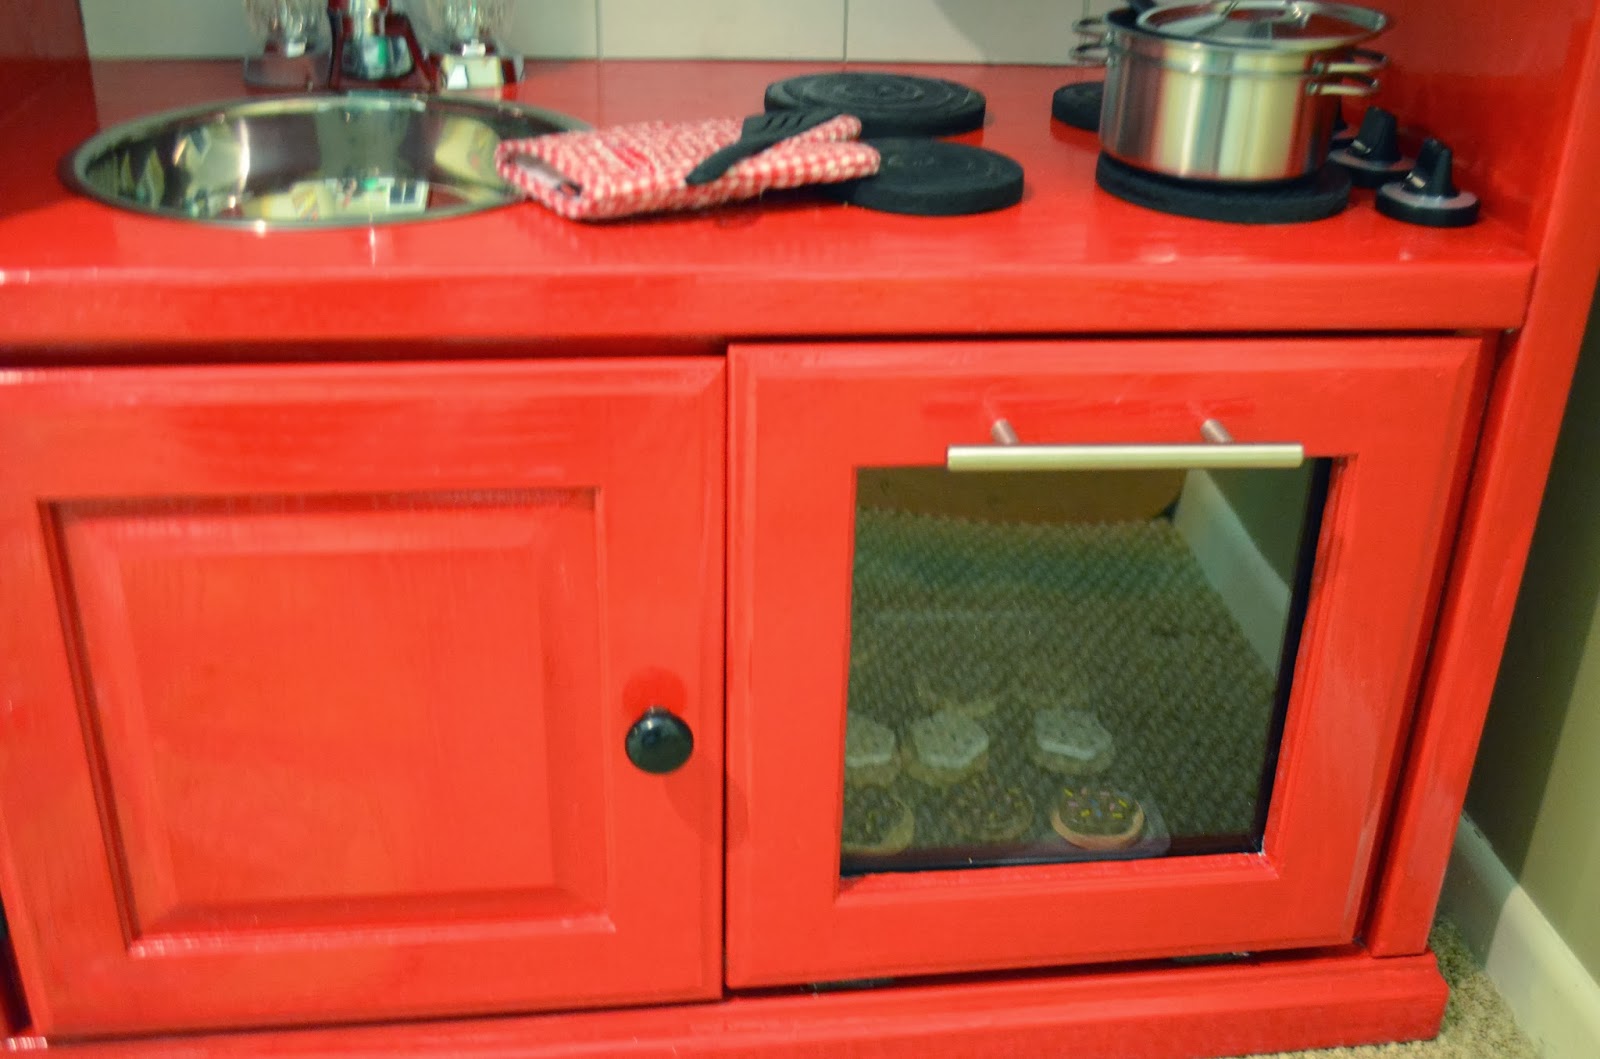

A cheap faucet from Home Depot and a mixing bowl make up the sink.  And we cut the round oven burners and added puffy paint for the raised effect. 


All in all, we probably spent about $130 on the kitchen, which is not cheap, and we probably could have gotten a plastic kitchen from the store for less than that on black Friday.  But, I seriously love that we made this all on our own, and took the extra time to put some love into the kitchen... and make it their very own.  I was awake at 4am on Christmas morning, I was too excited for them to see it, that I couldn't go back to sleep.  

Their reaction was pretty good... They loved it.  Honestly, other kids that have been over here have played with it more than they have, but I know that they will appreciate it for years to come. 

Anyone else spend the time to make gifts for their kids this Christmas?


Wednesday, November 14, 2012

DIY: Working with what you got

Last week, I made some new art for the kids playroom.  The best part... the total cost was $0!


Remember on my basement tour I said I needed something to cover that hole in the wall?  The hole is actually our circuit breaker, so I couldn't cover it up with anything permeant, I knew that art is what I needed.  (There was some art hanging there before,  but moved when this started to become our playroom)

I raided my fabric supply.  I dont usually buy fabric unless I know what I am going to do with it - but sometimes there is just something too cute to pass up.  I had 2 half yards of fun fabric that I had bought over 2 years ago... just waiting to be used for something.   I also had extra felt from left over projects.


 I also had these 2 large canvas from IKEA about 5 years ago.  There was nothing wrong with them, but they were sitting in our guest room.  (There was a 3rd one at somem point, but I used that on another project)

I printed off letters for the words: Learn, Play, Giggle and Love, traced them onto the felt.


 The funny thing, when I was thinking of words to say, all I could think was 'Play, Laugh, Grow' - but that is the Fisher Price tagline.  And it would bother me seeing those words every day...


 I love how the bright colors just go with all the bright colored toys in this room.


What do you think?  Not bad for a free project?!

Thursday, October 11, 2012

Throwback Thursday - Our TV Console

So I was looking around our house the other day, and realized how many things that we have done ourselves.  I mean, I know that we enjoy doing it, but over the 4 years, we have DIYed our way through so many things in our house.  So, I decided that I am going to share some of the things that may not have made their way to this blog, even if we did them a while ago - Hence the 'Throwback' 

2 years ago, I found this really cool console on Craigslist.  I had no idea what I was going to do with it, but I needed it. 


While it was not in the worst shape, it was not my style at all!  The wood on top looked really orange (this picture does not do it justice)

And the antiquing on the doors just made it look dirty.  

But I loved the shape, and some of the features it had.... 


And now here it is in our living room.  

Because it was going to house our TV components, I knew that no matter how hard we tried, the doors would be open the majority of the time.... so I took the extra time and painted the inside orange.  It makes it so fun and modern. 

Some Colby photo bombs!


I think that this is still one of my favorite pieces that I have done.  One, because I did it without Nate's help... And while I love doing things with him, I feel pride that I did it myself.  And because I wasn't lazy/too excited to get it in the house and took that extra time to add the orange.  It really makes the piece.

What do you think?

Tuesday, March 16, 2010

Pouf


So, West Elm has a Sheepskin Pouf- and I want it. I mean - REALLY want it - almost an obbsession!  However, I am not willing to pay $300 for this on sale.

 
So I am making one! Hopefully it will turn out. Pictures soon!

(Yes, this means that I have finally learned to use my sewing machine.  So far I have made 3 pillows. And one half of a sheep skin pouf)

PS- I am debating using a sheepskin rug from Ikea = real  sheep skin  and very soft or some fake sheep skin from JoAnne fabric still soft, but not as.  Price is nearly identicial, but I am deciding on my moral stance on it.....any opinion?

Wednesday, March 10, 2010

The Bar Disaster Zone

So Meg and I had a lot of fun making this bar but at times the house looked like the cats got into a fight with a pack of wolves. Next time we'll wait til it warms up outside...

Notice the progression of Colby's comfort as you scroll down and notice the absence of the little one.

We had to rope off the room off while sanding the cabinets

Look who's sleeping amid the wreckage...

Took me most of a day to clean up after this

Tuesday, March 9, 2010

The Bar - FINALLY!

It has finally been completed... whew!! You saw a little snapshot last week. Here are the rest...

Started with the cabinets

Added the trim

Got to use my router to make the appropriate cutouts for the outlets.


A few coats of paint

And it's almost as beautiful as my wife:)

Decorating is still a work in progress and probably always will be:)

We moved big red to the bar area for Brian to pass out in

Not as full as I would like... Can we say "stock the bar" party?!?

Saturday, February 20, 2010

New Shelf

For some reason, I don't really like glass shelves. I honestly don't know why, and when I see other peoples, I think that they look great, but not mine.  We have a little alcove on the stairs going from out main floor to our downstairs, and it had glass shelves. It bothered me, but I didn't do anything about if for over 2 years. 
Until about 2 weeks ago...

Below is the shelf before.....


I took some MDF (that we had left over from our cabinets) and cut them to the size I needed.  (Lesson learned: In older houses, don't assume that walls are going to be straight, therefore that the shelves will all be the same length - I learned this the hard way)


I painted all the shelves white, and then gave them a coat of polyurethane.


We had a set of 3 puck lights laying around the house. (We were originally going to have the lights over our TV but decided against it) So I set about installing those on the bottom of new shelves. Of course there were now cords all over the place, so I had to hide them.  I had this old round cardboard container in our linen closet, and new that it would work perfect to hide the excess cords.


Then my favorite part, to cover the cords running down behind the shelves, I found some awesome wrapping paper. Now, this wrapping paper was somewhat expensive, $7 per roll, but it was totally worth it.  I also had to buy a few foam boards to put the wrapping paper on ($12).

I didn't have enough wrapping paper to cover the very bottom or the very top shelves, which was okay with me, since they also didn't have any lights on them.

Oh yeah, I also put some trim on the fronts of the shelves, to give them more oomph. That was in the scrap section at Home Depot ($1)

So here is the before again, and the after:


Awesome new shelf for $20 :)

Wednesday, February 10, 2010

DIYer

Yes, if you haven't noticed by now, Nate and I love the challenge of doing projects ourselves. Tonight started our official bar building. (Finally, I know- but more on that in another post) So we have realized that there are several things that are common for us because of this.

1. Never know where the tape measure is. We are always measuring things, thinking of new ideas, sketching ideas out, so our tape measure is always on the move.
2. We have 2 tool belts hanging in our laundry room. I got my awesome pink tool belt from my sister and bro in law for my birthday, and finally Nate realized how great they are and got himself a blue one :)
3. Taking into the top 2, we both fight over who gets to have the tape measure in their tool belt.
4. We go to Home Depot, Mendards, etc at least once a week.
5. We have a 'home projects' line item into our monthly budgeting.
6. We frequently have to shop vac the saw dust out of our laundry room, since it is too cold to do any work in the garage
7. The cats aren't scared of power tools
8. We each have our own safety goggles
9. Our projects list is usually about 5 items long
10. Nate commonly points out furniture and says 'I can make that'

We both love the challenge, getting something new for less than at stores, and having fun together while we do projects.

While DIY is not for everyone, it is for us. Do you DIY?

Thursday, January 28, 2010

The Bar


We are finally going to get to work on the bar this next month. We have a few ideas of where we're going to start. We're going with something close to what Meg has shown before.
Top is going to look like the desk shown above


Thinking about going the semi-classy route with a couple of chairs and the couch but...
Still love to have a poker table and the dart board...
The challenge is to know how much stuff you can put into an 8'x8' room. Guess we'll see!!!